
In part II, here what you will learn:
- Configuring AWS EC2 Userdata with Terraform
- Setting Up VSCode SSH Configuration
- Utilizing Terraform Provisioners
- Installing Docker on EC2 before deploying
- Replacing Resources and Deploying EC2 with Terraform
- Working with Terraform Variables
- Using Terraform Conditional Expressions
- Basics of Terraform Outputs
Part II:
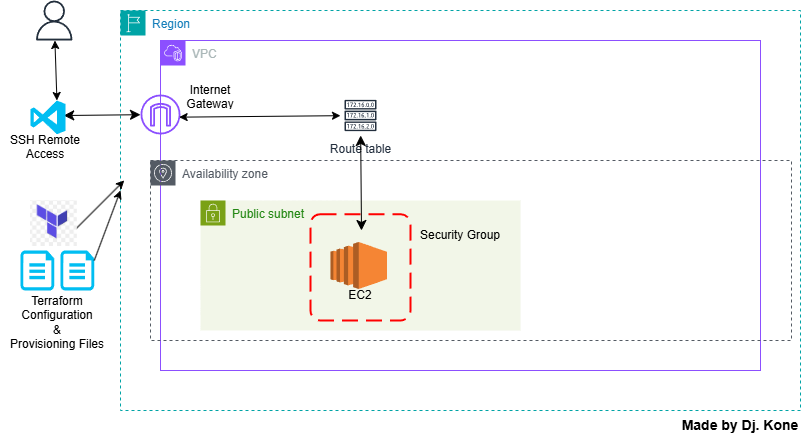
Launching an AWS EC2 Instance with Terraform
- Google “AWS EC2 resource in terraform”. You should land on the section in the terraform documentation that mention AWS EC2.
- Go back to VS Code and add the block to main.tf in the Terraform directory.
- Enter the necessary information needed to create a VPC.

- Run
terraform plan, thenterraform apply -auto-approve. You should see a new resource. - Reorganize the code in main.tf

Configuring AWS EC2 Userdata with Terraform
- Add userdata to our content to boostrap our instance. Boostrap goes over instance for docker to be ready.
- Create a new file named userdata.tpl

- Add it to the resource “aws_instance”

- Run
terraform plan, thenterraform apply -auto-approve. You should see a new resource. - Go to EC2 dashboard to verify.

- Or run
terraform state list

- Run
terraform state show aws_instance.dev_node

- Copy and save the public IP address to connect “44.202.189.9”

- Connect to the instance:
ssh -i ~/.ssh/keypairname username@ippublicaddress

- When connected, verify if docker is installed

Setting Up VSCode SSH Configuration
- Go to the extension, and search for “Remote — SSH”. Install it.

- Go back to explorer and type:
cat ~/.ssh/config - Create a file named “windows-ssh-config.tpl

- Create another file for linux named “linux-ssh-config.tpl

Utilizing Terraform Provisioners
- Go back to main.tf, under resource “aws_instance” enter this code

- Run
terraform state list - Run
terraform apply-replace aws_instance.dev_node

- Enter Y.
- Go to your console and verify if itt’s working.

- Enter
cat ~/.ssh/config, you should get a correct result.
Installing Docker on EC2 before deploying
- In VS code, go to view. Click on Command palette, then ssh. Check the IP address and click on it.

- Select Linux, and click OK.

- Open terminal and run
docker - Run
docker --version

- Click “Yes, I trust the authors”.

- You’ve deployed a DEV environment using Terraform, and accesible via SSH remote. You can stop the lab here.

BONUS: Or you can continue the lab.
Let’s try to optimize what I did. I am going to modify couple of scripts to adjust everything.
Replacing Resources and Deploying EC2 with Terraform
- Modify the type of OS we are using. Change windows in the provisioner so that it can be useful when using other operating systems.

- Use the interpolation syntax: $ { } which is a calculated variable used
- Create a new file named “variables.tf”
- Go to the terraform document. Search for “Declaring an input variable”
- Copy the code and enter the necessary changes

- Save the file.
- Run
terraform destroy -auto-approve. Enter windows when a value is requested.

Working with Terraform Variables
- The system is requesting to define var.host_os
- Create a new file named “terraform.tfars” with the following details

- Create a another file named “dev.tfars” with the following details

- Run the following command: terraform console -var-file=”dev.tfars”, then enter the variable

Using Terraform Conditional Expressions
- Run the following command: terraform console -var=”host_os=windows”, then enter the variable

- You realize you should set or change the interpreter by integrating variables.

- Run
terraform plan, then runterraform apply -auto-approve. - If nothing change, run
terraform plan -refresh-only.

Basics of Terraform Outputs
- Launch terraform console, and type aws_instance.dev_node.public_ip to view IP address.
- Create a new file “outputs.tf”

- Run
terraform apply -refresh-only.

- Run
terraform output.to see the final result.

This is how you can optimize your terraform script with variables and outputs. This is the end.
If you missed PART I: here it is https://cloudwithdj.com/building-a-dev-environment-on-aws-using-terraform/
Thank you for reading and/or following along!

Leave a Reply